www.flickr.com
Maid Mirawyn's Photos Maid Mirawyn's Photos
Showing posts with label art. Show all posts

Saturday, August 19, 2006

Andy Goldsworthy, Nature, and Time


About three years ago, when I was finishing up my art degree, I took a sculpture class with Kyle Dillehay (who is definitely a very cool professor). He introduced our class to the work of Andy Goldsworthy, a truly intriguing artist.

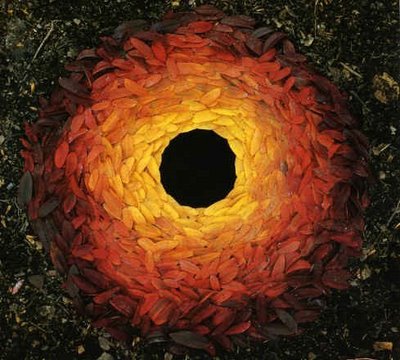
Goldsworthy's work doesn't follow the usual course of things. He works with found natural materials, creating ephemeral works which are nevertheless breathtaking. They can be as small as a single stone, covered with petals, or a massive cairn constructed of stone. Some last only minutes; others withstand years of exposure to the elements.

I'm not entirely sure why his work so appeals to me. I love being outside, so I'm sure that's part of it. I just love God's creation; it reminds me of just how awesome He is, how far beyond us, and how blessed I am that He loves me. For me, the creative use of God's creation is truly inspiring, in a way nothing else can ever be.

The simplicity of the design is also appealing. Many of his pieces employ very basic techniques, such as stringing together leaves, sculpting sand, or stacking stones. It makes the work seem so approachable, inspiring an "I can do that!" response. I'm inspired to go outside and play, just to see what I can come up with.

But despite the simple forms, Andy Goldsworthy is a true master of design. "Simple" can mean many things; simplicity of form is not the same as "easy!" The example here uses only colored leaves, arranged in that most basic of forms, a circle. When there is so little to work with, real mastery of the principles of art is essential to create something so stunning.
Tuesday, August 23, 2005

Lessons from an art & craft fair


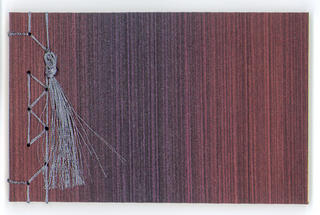
Well, I have been very busy the last three weeks. I decided to do my very first arts & crafts fair–with only three weeks to prepare for it! The first week, I made twenty-five little pamphlet stitch booklets, some plain, some embellished. The second, I made twelve Japanese stab bound books. The third week, I made five hardcover, open spine, french braid-bound books and five hardcover accordian fold books, which I dubbed "brag books."

Obviously I didn't sleep much… But it was a really great experience, even though I didn't sell very many books. I did sell enough to cover my costs–but just barely! Mainly, I learned how it all works, and what types of venues not to choose. (I think handmade books were a bit too "gourmet" for my soccer mom audience. Not that I have anything against soccer moms: I am so glad my own mother was an at-home mom! They're just a very "kid-focused" audience. I might have had better luck closer to Christmas.)

Here are my most important lessons:

First, work in an "assembly line," if possible. If I had tried to switch back and forth between book forms, or complete one whole book before starting another, I would have made maybe half that many books.

Second, give potential customers lots of ideas on how they can use your wares! If you can think of some really unusual uses for your "stuff," display some of them or make a sign suggesting them. For instance, I used an accordian book to create a memory book of my days at the Baptist Student Union at my college. I had all my friends sign it and then added rub-ons saying "have fun," "celebrate," and "friends," accompanied by photos.

Third, clearly mark all your prices. You don't have to have an enormous tag or sign, but just make sure that potiental customers can easily find it and read it. (Print out stickers if your handwriting is really bad!) Many people will just keep on going if they can't find a price!

Finally, remember what you are selling: your incredible work…not the display! If you have really beautiful items, keep it simple. You want to showcase the beauty of your work, not eclipse it. Your props, table coverings, even your signs, should never compete with your work! A simple rule of thumb: if you can't justify its presence, dump it!

Thursday, July 28, 2005

New art goodies

While in Chattanooga, I visited a small stamp & scrap convention. I am so glad I went! I found the most amazing, beautiful product: metallic powder gouache! It can be mixed in with other water-soluble media, especially watercolors, to add a bit of shimmer and sparkle. But it is most amazing when used straight: mixed with water, it creates a lush, creamy metallic paint! (It looks like liquid metal when wet.)

I purchased mine from Cherry Pie Art Stamps. The owner, Marina, is very nice. I'm going to ask if I can post a photo or two of her work with it. Until then, here's the link to a card from her gallery that uses it. (It's the gold border, and the gold speckling.)

I can't wait to play with it myself! Eventually, I'll create something I'm proud of, and then I will upload some scans.

Cherry Pie also has beautiful, mostly Old World-European rubber stamps. Unfortunately, I spent all my money on the paint, some Twinkling H2Os, and a couple of tools, so the stamps will have to wait.

Xandria

Saturday, July 16, 2005

Eraser Carving Fun

I found a few great sites on eraser carving today. I had practiced on erasers when I took printmaking, but I was just playing with line. Some carvers, though, have created some really impressive stamps.

If you are interested, the Carving Consortium has a really nice gallery of images, though browsing isn't very user friendly.

If you just want to play around with it, Stamp Mania Australia has clear, straightforward instructions to get you started. If you are serious, though, or a perfectionist like me, check out this page by Carolyn Hasenfratz of Lime Green Evolution. It's much more in-depth, and has great diagrams and examples. There's also good advice on choosing images to carve.

Another good site is Tabloid Trash. It's just an archive, now, with cross-links to the Carving Consortium, but there is a good "how to", as well as a nice gallery and the "C.O.W.", or Carving of the Week. Very nice! The instruction page is written by a non-artist, so there are lots of tips on working with copies. The transfer tips could be especially helpful.

The consensus is that pink rubber and art gum erasers aren't worth the effort, and I agree: the best pink or gum eraser won't work as well as an inexpensive white vinyl eraser. (Magic Rubs aren't as good as Staedtler Mars erasers, but you can still get good results with them, and can usually buy them by the dozen at one of the office supply superstores.) Just make sure your eraser doesn't have any raised areas (many Staedtlers do). If it does, it's unlikely your design will allow you to carve all of it away, and it will show up when you stamp. I found this out the hard way-I'm glad it was a quick, easy-to-carve design.